


After installing windows 10 on Desktop/Laptop unable to connect to Internet through WiFi and other wired LAN Ethernet network and showing limited or no connectivity, there may be multiple reasons for the Windows 10 limited connectivity issue/proplem, like WLAN AutoConfig service not started, network adapter didn’t got an IP address from DHCP server, Antivirus and third party security software, will discuss all in detail
Also Read: How to Get F8 Boot Menu and Safe Mode on Windows 10
How to check and start the WLAN AutoConfig service
- Windows Key + R – Run a command
- Type Services.msc
- And Click Enter
- Scroll down to WLAN AutoConfig
- Double click
- Change startup type to Auto
- Click the Start button
- Close the Window
- Check the wireless network status
Check the problem using Windows Network Diagnostics tool
- Open Network Diagnostics by right-clicking the network icon
- Click Diagnose and repair
- This will check and give you a error like the below
- Windows couldn’t automatically bind the IP protocol stack to the network adapter
Also Read: Troubleshooting Tips for Windows 7, 8.1 and Windows 10 Slowness Problems
Following steps can rebuild the winsock catalog and solve the issue
This also rebuilds the TCP/IP Stack which resolve IP address and IP stack problems
- Right-click the Start Menu
- Click Command Prompt (Admin)
- Now will see Administrator: Command Prompt
- Type below command to reset WINSOCK entries
- netsh winsock reset catalog
- Enter
- Type below command to reset IP Stack
- netsh int ip reset resetlog.txt
- Type below command to reset IPv4 TCP/IP Stack
- netsh int IPv4 reset resetlog.txt
- Entre
- Reboot the system to apply the changes
Also Read: Windows 10 Keyboard Shortcuts Tricks and Tips
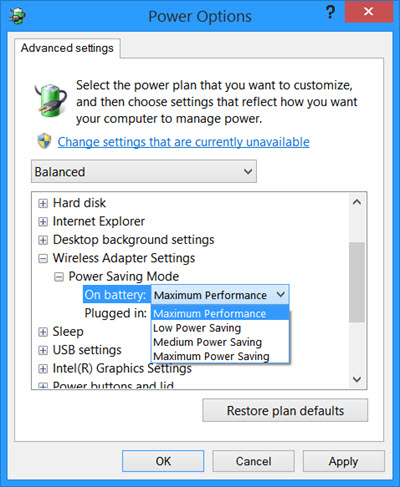
Problem with the power settings in WiFi Adapter
Change the power options to resolve the issue, WiFi Adapter might be set as saving mode and this needs to change to max performance
- Open Power Options Control Panel
- Click Change plan settings link
- Click Change advanced power settings
- Power Options settings will open
- Scroll down to On battery drop down menu
- SelectMaximum Performance.
Problem with the Network Driver in Windows 10
Check my previous article to Update affected drivers in Windows 10
Check any third-party security application causing the issue
Try to uninstall Antivirus and check again, I have seen issue with the current Antivirus configuration which caused the network connectivity issue in Windows 10
Also Read: Printer showing offline after upgraded to Windows 10 from Windows 8 and Windows 7
Related posts:
 Windows 10 Keyboard Shortcuts Tricks and Tips
 Fix: SD card not working issue and How to upload pictures from SD card on Windows 10
 How to Change Windows 10 Date and Time Format from 24 Hour to 12 Hour Clock
 Difference between windows 10 hyper v and windows server 2012r2 hyper v
Why Chrome & Edge have so many processes in Windows 10
Difference between windows 10 hyper v and windows server 2012r2 hyper v
Why Chrome & Edge have so many processes in Windows 10

